Friday, June 12, 2015

Troubleshooting On SSH hangs and Machine Stuck When Massive IO-Intensive Processes Are Running

It is inevitable that some users will write and execute devastating code inadvertently on public service-providing machines. Hence, we should enhance the robustness of our machine to the greatest extent.

Today, one of our users forked processes as many as possible, all executing `hadoop get`. As a result, it ate up all of our IO resources even though I've constrained CPU and Memory via `cgroups` upon this specific user. At this time, the phenomenon is that we could neither interact with the prompt nor ssh to this machine anymore. I managed to invoke `top` command before it was fully stuck. This is what it shows:
top - 18:26:10 up 238 days,  5:43,  3 users,  load average: 1782.01, 1824.47, 1680.36
Tasks: 1938 total,   1 running, 1937 sleeping,   0 stopped,   0 zombie
Cpu(s):  2.4%us,  3.0%sy,  0.0%ni,  0.0%id, 94.5%wa,  0.0%hi,  0.0%si,  0.0%st
Mem:  65923016k total, 65698400k used,   224616k free,    13828k buffers
Swap: 33030136k total, 17799704k used, 15230432k free,   157316k cached

As you can see, load average is at an unacceptable peak, and %wa is above 90 (%wa - iowait: Amount of time the CPU has been waiting for I/O to complete). In the meantime, memory has swallowed almost all memory with 17GB swap space being used. Obviously, this is due to the too many processes executing `hadoop get` command.

Eventually, I set the maximum number of processes and open files that the user can fork and open respectively. In this way, conditions will be alleviated to an acceptable scenario.

The configuration is at '/etc/security/limits.conf', we have to edit it in root user. Append the following content to the file:
username      soft    nofile  5000
username      hard    nofile  5000
username      soft    nproc   100
username      hard    nproc   100

Also, there's a nice post regarding how to catch the culprit causing high IO wait in linux.

Reference:
1. Limiting Maximum Number of Processes Available for the Oracle User
2. how to change the maximum number of fork process by user in linux
3. ulimit: difference between hard and soft limits
4. High on %wa from top command, is there any way to constrain it
5. How to ensure ssh via cgroups on centos
6. fork and exec in bash


Saturday, May 30, 2015

Constrain Memory And CPU Via Cgroups On Linux

Limitations on memory and CPU is required inevitably on public-service-provided linux machines like gateways, since there are times that resources on these nodes have been eaten up by clients so that administrators could hardly ssh to the problematic machine when it's stuck.

cgroups (abbreviated from control groups) is a Linux kernel feature that limits, accounts for and isolates the resource usage (CPU, memory, disk I/O, network, etc.) of a collection of processes. And the way to limit a group of users to a specific upperbound for both memory and CPU is as follows.

Firstly, we have to install cgroups just in case it is not on your linux server. In my scenario, the environment is CentOS-6.4 and the following command will just complete the installation process (you need to enable EPEL repository on CentOS of yum command and ensure that CentOS has to be version 6.x).
yum install -y libcgroup

Make it persistent by changing it to 'on' in the runlevel you are using. (Refer to chkconfig and Run Level on Linux)
chkconfig --list | grep cgconfig
chkconfig --level 35 cgconfig on

After that, cgroups is already installed successfully.


Just before we move on to configure limitations via cgroups, we should first put all of our client users in the same group for the purpose of management as a whole. Related commands are as below:
/usr/sbin/groupadd groupname    # add a new group named groupname
usermod -a -G group1,group2 username    # apply username to group1 and group2
groups username    # To check a user's group memberships, use the groups command


Now it's time to configure memory and CPU limitation in '/etc/cgconfig.conf', to which, append the following settings:
group gateway_limit {
    memory {
        memory.limit_in_bytes = 8589934592;
    }

    cpu {
        cpu.cfs_quota_us = 3000000;
        cpu.cfs_period_us = 1000000;
    }
}

Configuration for memory is well self-explained, and that for CPU is defined in this document. In essence, if tasks in a cgroup should be able to access a single CPU for 0.2 seconds out of every 1 second, set cpu.cfs_quota_us to 200000 and cpu.cfs_period_us to 1000000. Note that the quota and period parameters operate on a CPU basis. To allow a process to fully utilize two CPUs, for example, set cpu.cfs_quota_us to 200000 and cpu.cfs_period_us to 100000. If relative share of CPU time is required, setting 'cpu.shares' could be applied. But according to this thread, 'cpu.shares' is work conservingly, i.e., a task would not be stopped from using cpu if there is no competition. If you want to put a hard limit on amount of cpu a task can use, try setting 'cpu.cfs_quota_us' and 'cpu.cfs_period_us'.

After that, we should connect our user/group with the above cgroups limitations in '/etc/cgrules.conf':
@gatewayer      cpu,memory      gateway_limit/

it denotes that for all users in group 'gatewayer', CPU and memory is constrained by 'gateway_limit' which is configured as above.

Notice that if we configure two different lines for the same user/group, then the second line setting will fail, so don't do that:
@gatewayer      memory      gateway_limit/
@gatewayer      cpu      gateway_limit/

Now we have to restart all the related services. Note that we have to switch to path '/etc' in order to execute the following commands without failure, cuz 'cgconfig.conf' and 'cgrules.conf' is available in that path.
service cgconfig restart
service cgred restart  #cgred stands for CGroup Rules Engine Daemon

Eventually, we should verify that all settings have all been hooked up to specific users as expected.

The first way to do that is to login to a user who is in group 'gatewayer', invoking `pidof bash` to check out current PID for the bash terminal. Then `cat /cgroup/cpu/gateway_limit/cgroup.procs` as well as `cat /cgroup/memory/gateway_limit/cgroup.procs` to see whether the former PID is in here. If so, it means memory and CPU is monitored by cgroups for the current user.

The second way to achieve this is a little bit simpler, for you only have to login to a user, execute `cat /proc/self/cgroup`. If gateway_limit is applied both to memory and CPU as follows, then it is well configured.
246:blkio:/
245:net_cls:/
244:freezer:/
243:devices:/
242:memory:/gateway_limit
241:cpuacct:/
240:cpu:/gateway_limit
239:cpuset:/

As for testing, here's a memory-intensive python script that could be used to test memory limitation:
import string
import random
import time

if __name__ == '__main__':
    d = {}
    i = 0;
    for i in range(0, 900000000):
        d[i] = some_str = ' ' * 512000000
        if i % 10000 == 0:
            print i

When monitoring via `ps aux | grep this_script_name`, the process is killed when the consuming cpu exceeds the upperbound set in cgroups. FYI, swappiness is currently set to 0, thus no swap space will be used when physical memory is exhausted and the process will be killed by Linux kernel. If we intend to make our Linux environment more elastic, we could modify swappiness to a higher level (default is 60).

For CPU-intensive test, referencing to this thread, the following command will be executed on the specific user to create multiple processes consuming CPU time. On another terminal window, we could execute `top -b -n 1 | grep current_user_name_or_dd | awk '{s+=$9} END {print s}'` to sum up all the dd processes CPU time.
fulload() { dd if=/dev/zero of=/dev/null | dd if=/dev/zero of=/dev/null | dd if=/dev/zero of=/dev/null | dd if=/dev/zero of=/dev/null & }; fulload; read; killall dd


Reference:
1. cgroups documentation
2. cgroups on centos6
3.1. cgrules.conf(5) - Linux man page
3.2. cgconfig.conf(5) - Linux man page
4. how-to-create-a-user-with-limited-ram-usage - stackexchange
5. how-can-i-configure-cgroups-to-fairly-share-resources-between-users - stackexchange
6. how-can-i-produce-high-cpu-load-on-a-linux-server - superuser
7. shell-command-to-sum-integers-one-per-line - stackoverflow
8. Why does Linux swap out pages when I have many pages cached and vm.swappiness is set to 0 - quora


Wednesday, April 22, 2015

Arm Nginx With 'Keepalived' For High Availability (HA)

Prerequisite

After obtaining a general understanding and grasp on the basics of  Nginx deployed upon Vagrant environment, which could be found at this post, today I'm gonna enhance my load balancer with a tool named 'Keepalived' for the purpose of keeping it HA.

Keepalived is a routing software whose main goal is to provide simple and robust facilities for load balancing and high-availability to Linux system and Linux based infrastructures.

There're 4 vagrant envs, from node1(192.168.10.10) to node4(192.168.10.13) respectively. I intend to deploy Nginx and Keepalived on node1 and node2, whereas NodeJS resides in node3 and node4 supplying with web service.

The network interfaces on every node resembles:
[root@node1 vagrant]# ip addr
1: lo: <LOOPBACK,UP,LOWER_UP> mtu 16436 qdisc noqueue state UNKNOWN 
    link/loopback 00:00:00:00:00:00 brd 00:00:00:00:00:00
    inet 127.0.0.1/8 scope host lo
    inet6 ::1/128 scope host 
       valid_lft forever preferred_lft forever
2: eth0: <BROADCAST,MULTICAST,UP,LOWER_UP> mtu 1500 qdisc pfifo_fast state UP qlen 1000
    link/ether 08:00:27:ae:97:4f brd ff:ff:ff:ff:ff:ff
    inet 10.0.2.15/24 brd 10.0.2.255 scope global eth0
    inet6 fe80::a00:27ff:feae:974f/64 scope link 
       valid_lft forever preferred_lft forever
3: eth1: <BROADCAST,MULTICAST,UP,LOWER_UP> mtu 1500 qdisc pfifo_fast state UP qlen 1000
    link/ether 08:00:27:61:c2:b2 brd ff:ff:ff:ff:ff:ff
    inet 192.168.10.10/24 brd 192.168.10.255 scope global eth1
    inet6 fe80::a00:27ff:fe61:c2b2/64 scope link 
       valid_lft forever preferred_lft forever

As we can see, all our inner IP communications are on 'eth1' interface. Thus we will create our virtual IP on 'eth1'.

Install Keepalived

It's quite easy to deploy it on my vagrant env (CentOS), `yum install keepalived` will do all the jobs for u.

Vim '/etc/keepalived/keepalived.conf' to configure Keepalived for both node1 and node2. All is the same BUT the 'priority' parameter: setting to 101 and 100 respectively.
vrrp_instance VI_1 {
        interface eth1
        state MASTER
        virtual_router_id 51
        priority 101
        authentication {
            auth_type PASS
            auth_pass Add-Your-Password-Here
        }
        virtual_ipaddress {
            192.168.10.100/24 dev eth1 label eth1:vi1
        }
}

In this way, we've set up a virtual interface 'eth1:vi1' with the IP address 192.168.10.100.

Start Keepalived by issuing command `/etc/init.d/keepalived start` on both nodes. We should see that there's a multiple IP address configured on 'eth1' interface via command `ip addr` on the node which starts Keepalived first:
[root@node2 conf.d]# ip addr
1: lo: <LOOPBACK,UP,LOWER_UP> mtu 16436 qdisc noqueue state UNKNOWN 
    link/loopback 00:00:00:00:00:00 brd 00:00:00:00:00:00
    inet 127.0.0.1/8 scope host lo
    inet6 ::1/128 scope host 
       valid_lft forever preferred_lft forever
2: eth0: <BROADCAST,MULTICAST,UP,LOWER_UP> mtu 1500 qdisc pfifo_fast state UP qlen 1000
    link/ether 08:00:27:ae:97:4f brd ff:ff:ff:ff:ff:ff
    inet 10.0.2.15/24 brd 10.0.2.255 scope global eth0
    inet6 fe80::a00:27ff:feae:974f/64 scope link 
       valid_lft forever preferred_lft forever
3: eth1: <BROADCAST,MULTICAST,UP,LOWER_UP> mtu 1500 qdisc pfifo_fast state UP qlen 1000
    link/ether 08:00:27:3d:42:e0 brd ff:ff:ff:ff:ff:ff
    inet 192.168.10.11/24 brd 192.168.10.255 scope global eth1
    inet 192.168.10.100/24 scope global secondary eth1:vi1
    inet6 fe80::a00:27ff:fe3d:42e0/64 scope link 
       valid_lft forever preferred_lft forever

In my case, it is node2 who currently is the master of Keepalived. When shutting down node2 from host machine with command `vagrant suspend node2`, we could see that this secondary IP address '192.168.10.100' switches to node1. At this time, we should be able to `ping 192.168.10.100` from any nodes successfully.

Combine With Nginx

Now it's time to take full advantage of Keepalived to avoid Nginx (our load balancer) from single point of failure (SPOF). `vim /etc/nginx/conf.d/virtual.conf` to revise Nginx configuration file:
upstream nodejs {
    server 192.168.10.12:1337;
    server 192.168.10.13:1337;
    keepalive 64;    # maintain a maximum of 64 idle connections to each upstream server
}

server {
    listen 80;
    server_name 192.168.10.100
                127.0.0.1;
    access_log /var/log/nginx/test.log;
    location / {
        proxy_set_header X-Real-IP $remote_addr;
        proxy_set_header X-Forwarded-For $proxy_add_x_forwarded_for;
        proxy_set_header Host  $http_host;
        proxy_set_header X-Nginx-Proxy true;
        proxy_set_header Connection "";
        proxy_pass      http://nodejs;

    }
}

In our 'server_name' parameter, we set both the Virtual IP set by Keepalived and localhost IP. The former one is for HA whereas the latter is for vagrant port forwarding.

Luanch Nginx service on both node1 and node2, meanwhile, run NodeJS on node3 and node4. Then we should be able to retrieve the web content on any nodes via command `curl http://192.168.10.100` as well as `curl http://127.0.0.1`. Shutting down either node1 or node2 will not affect any node retrieving web content via `curl http://192.168.10.100`.


Related Post:
1. Guide On Deploying Nginx And NodeJS Upon Vagrant On MAC


Reference:
1. keepalived Vagrant demo setup - GitHub
2. How to assign multiple IP addresses to one network interface on CentOS
3. Nginx - Server names


Friday, April 17, 2015

Install Maven Repository Upon Nexus

Recently, a centralized maven repository is required. Thus I'm embarking on installing a company-scoped Maven Repository these days, and it turns out to be quite easy :] Here's the main procedures.

Environment

CentOS 6.4
nexus 2.11.2-06
JDK 1.7.0_11


Procedure

Firstly, we have to install JDK. This is too piece-of-cake to elaborate here (you could google out bunch of tutorials).

After installing JDK, we could download the latest version of Nexus (NEXUS OSS TGZ) from its website. untar it and copy it to '/home/workspace' directory.

vim '$NEXUS_HOME/conf/nexus.properties' and change 'nexus-work' variable to the path where your repository files will all be resided in. This path should be created manually before Nexus is launched. Meanwhile, you could change the default 'application-host' and 'application-port' to whatever you prefer.

Then, we could simple use `$NEXUS_HOME/bin/nexus start/stop` to manipulate Nexus service.

When Nexus starting, we could access via URL 'http://10.100.7.162:8081/nexus/' (In my case, it is an inner ip of our company). The default admin user is "admin" and password is "admin123".

As for the URL, we should always append the ending '/', otherwise it would fail to resolve the webpage.

Now, we could upload our own maven project, which will act as a dependency in other projects, to Nexus. In pom.xml, add the following code:
<pluginRepositories>
    <pluginRepository>
        <id>nexus</id>
        <name>nexus</name>
        <url>http://10.100.7.162:8081/nexus/content/groups/public/</url>
        <releases><enabled>true</enabled></releases>
        <snapshots><enabled>true</enabled></snapshots>
    </pluginRepository>
</pluginRepositories>


<distributionManagement>
    <repository>
        <id>nexus-releases</id>
        <name>Nexus Releases Repository</name>
        <url>http://10.100.7.162:8081/nexus/content/repositories/releases/</url>
    </repository>
    <snapshotRepository>
        <id>nexus-snapshots</id>
        <name>Nexus SnapShots Repository</name>
        <url>http://10.100.7.162:8081/nexus/content/repositories/snapshots/</url>
    </snapshotRepository>
</distributionManagement>

Then, we should `vim ~/.m2/settings.xml` and add the following code for the purpose of authentication:
<servers>
  <server>
    <id>nexus-releases</id>
    <username>admin</username>
    <password>admin123</password>
  </server>
  <server>
    <id>nexus-snapshots</id>
    <username>admin</username>
    <password>admin123</password>
  </server>
</servers>


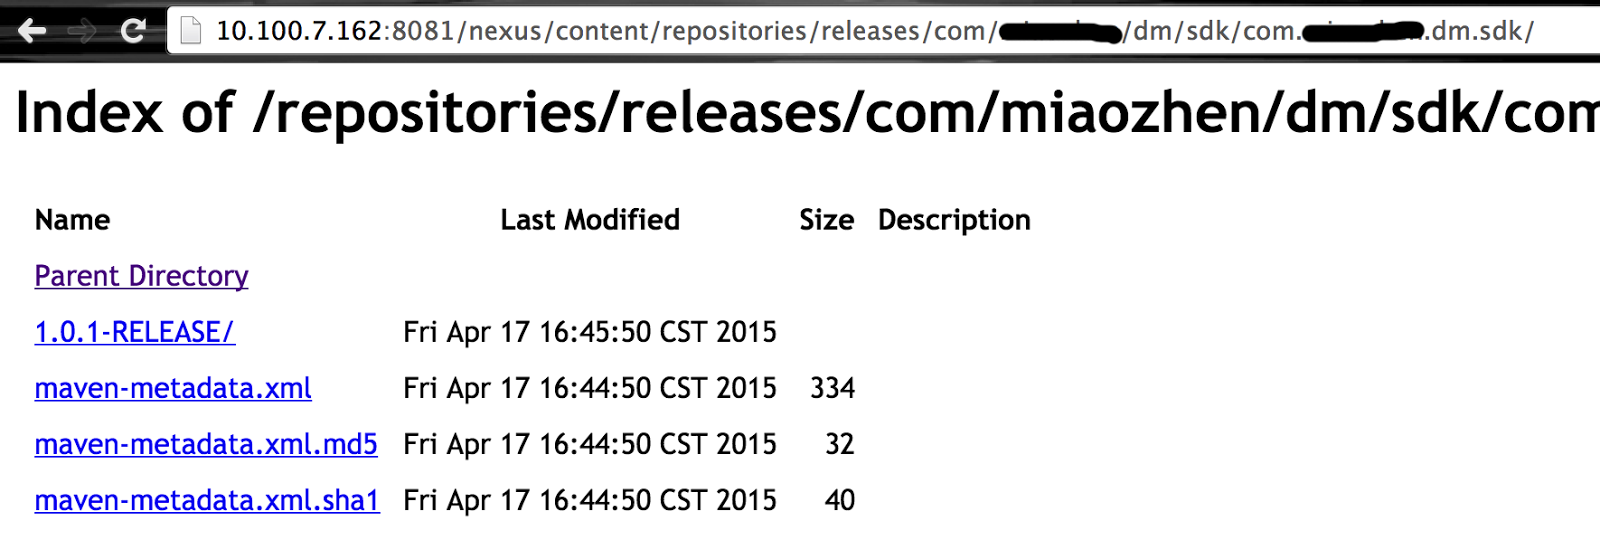
Finally, we `cd` to the project's root directory, execute `maven clean deploy`. When finished, we should see our project's jar file and auxiliary configuration files is uploaded to our Nexus server.


It's time to harvest and check on our private maven repository. Open a project which depends on the project we just uploaded to Nexus, open its pom.xml and add the following code to it:
<repositories>
    <repository>
        <id>nexus</id>
        <name>nexus</name>
        <url>http://10.100.7.162:8081/nexus/content/groups/public/</url>
        <releases>
            <enabled>true</enabled>
        </releases>
        <snapshots>
            <enabled>true</enabled>
        </snapshots>
    </repository>
</repositories>

<dependencies>
    <dependency>
        <groupId>com.XXX.dm.sdk</groupId>
        <artifactId>com.XXX.dm.sdk</artifactId>
        <version>1.0.1-RELEASE</version>
    </dependency>
</dependencies>

<pluginRepositories>
    <pluginRepository>
        <id>nexus</id>
        <name>nexus</name>
        <url>http://10.100.7.162:8081/nexus/content/groups/public/</url>
        <releases>
            <enabled>true</enabled>
        </releases>
        <snapshots>
            <enabled>true</enabled>
        </snapshots>
    </pluginRepository>
</pluginRepositories>


We could see that our private dependency is referenced correctly :]


Enhancement

#---1---# Beautify URL For Nexus Service
If we intend to resolve our content webpage to 'http://10.100.7.162/content/', without port specification as well as '/nexus/' heading part. we should set our '$NEXUS_HOME/conf/nexus.properties' like this:
# Jetty section
application-port=80
application-host=0.0.0.0
nexus-webapp=${bundleBasedir}/nexus
nexus-webapp-context-path=

# Nexus section
nexus-work=/home/data/nexus_repo
runtime=${bundleBasedir}/nexus/WEB-INF

In order to specify port to 80, we need to operate on Nexus as root user; And according to this post, put null in parameter 'nexus-webapp-context-path' would just do the trick removing the '/nexus/' heading.

#---2---# Increase Memory Of Nexus Service
We should increase the memory allocating to Nexus. This is well-explained in its official document.

epilogue

After running Nexus the first time, we should make some configurations before taking full advantage of it.

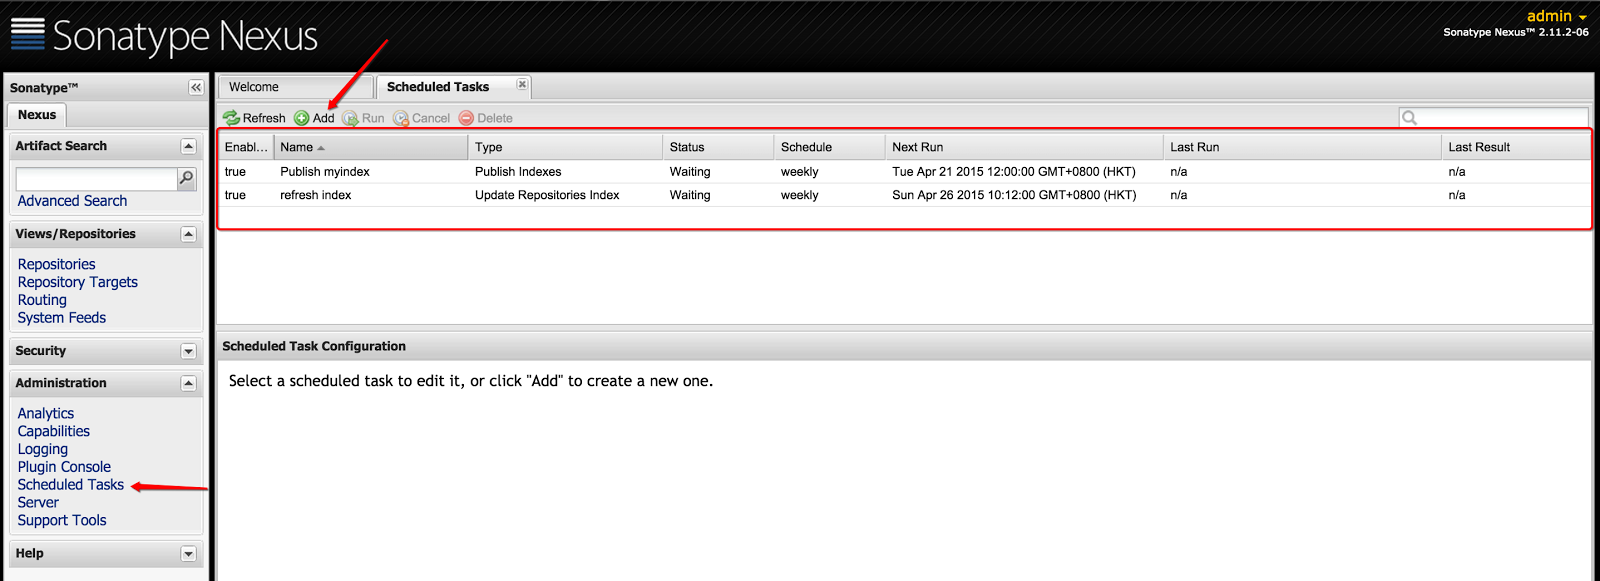
#---1---# Adding Scheduled Tasks
The first thing to do is to add two scheduled tasks, namely, updating repositories index and publish indexes, as depicted below. The function of these scheduled tasks is described here, mainly to update proxy repositories information:


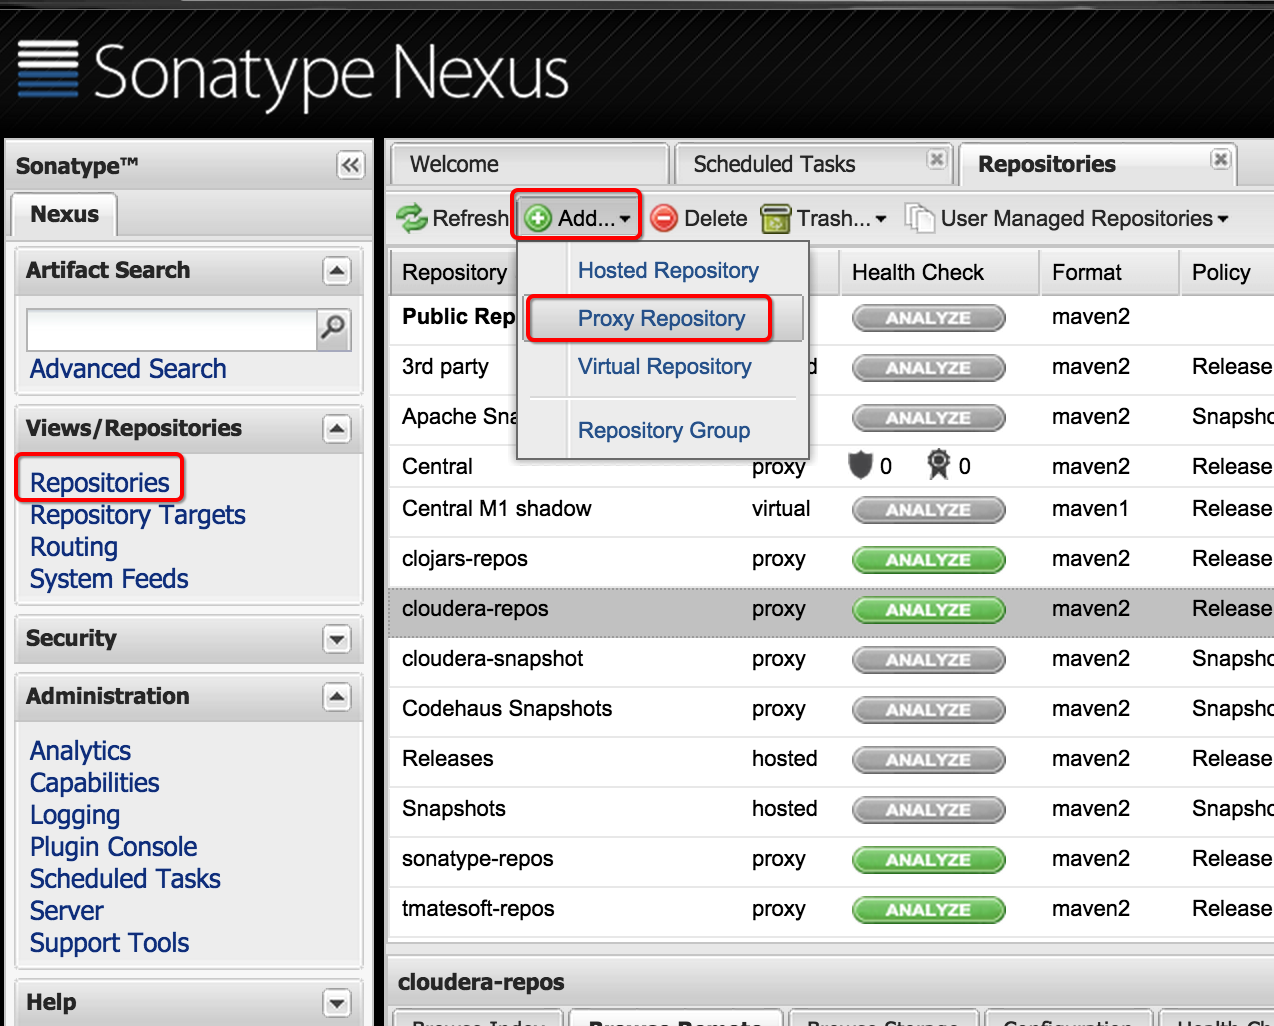
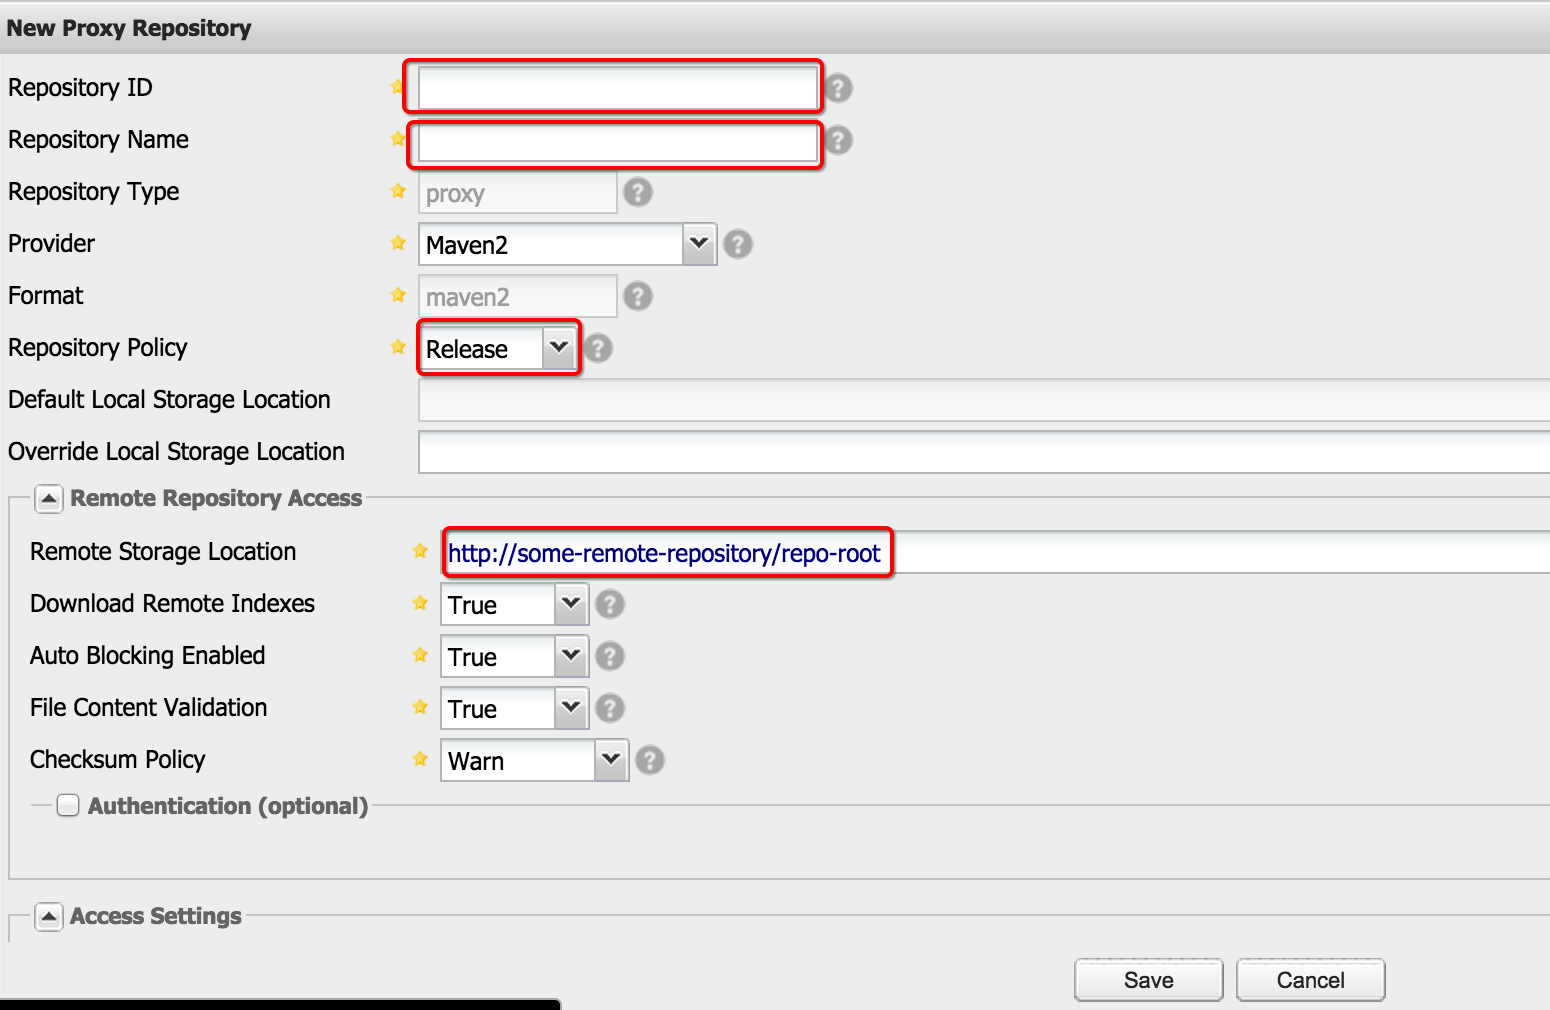
#---2---# Configuring Proxy Repositories
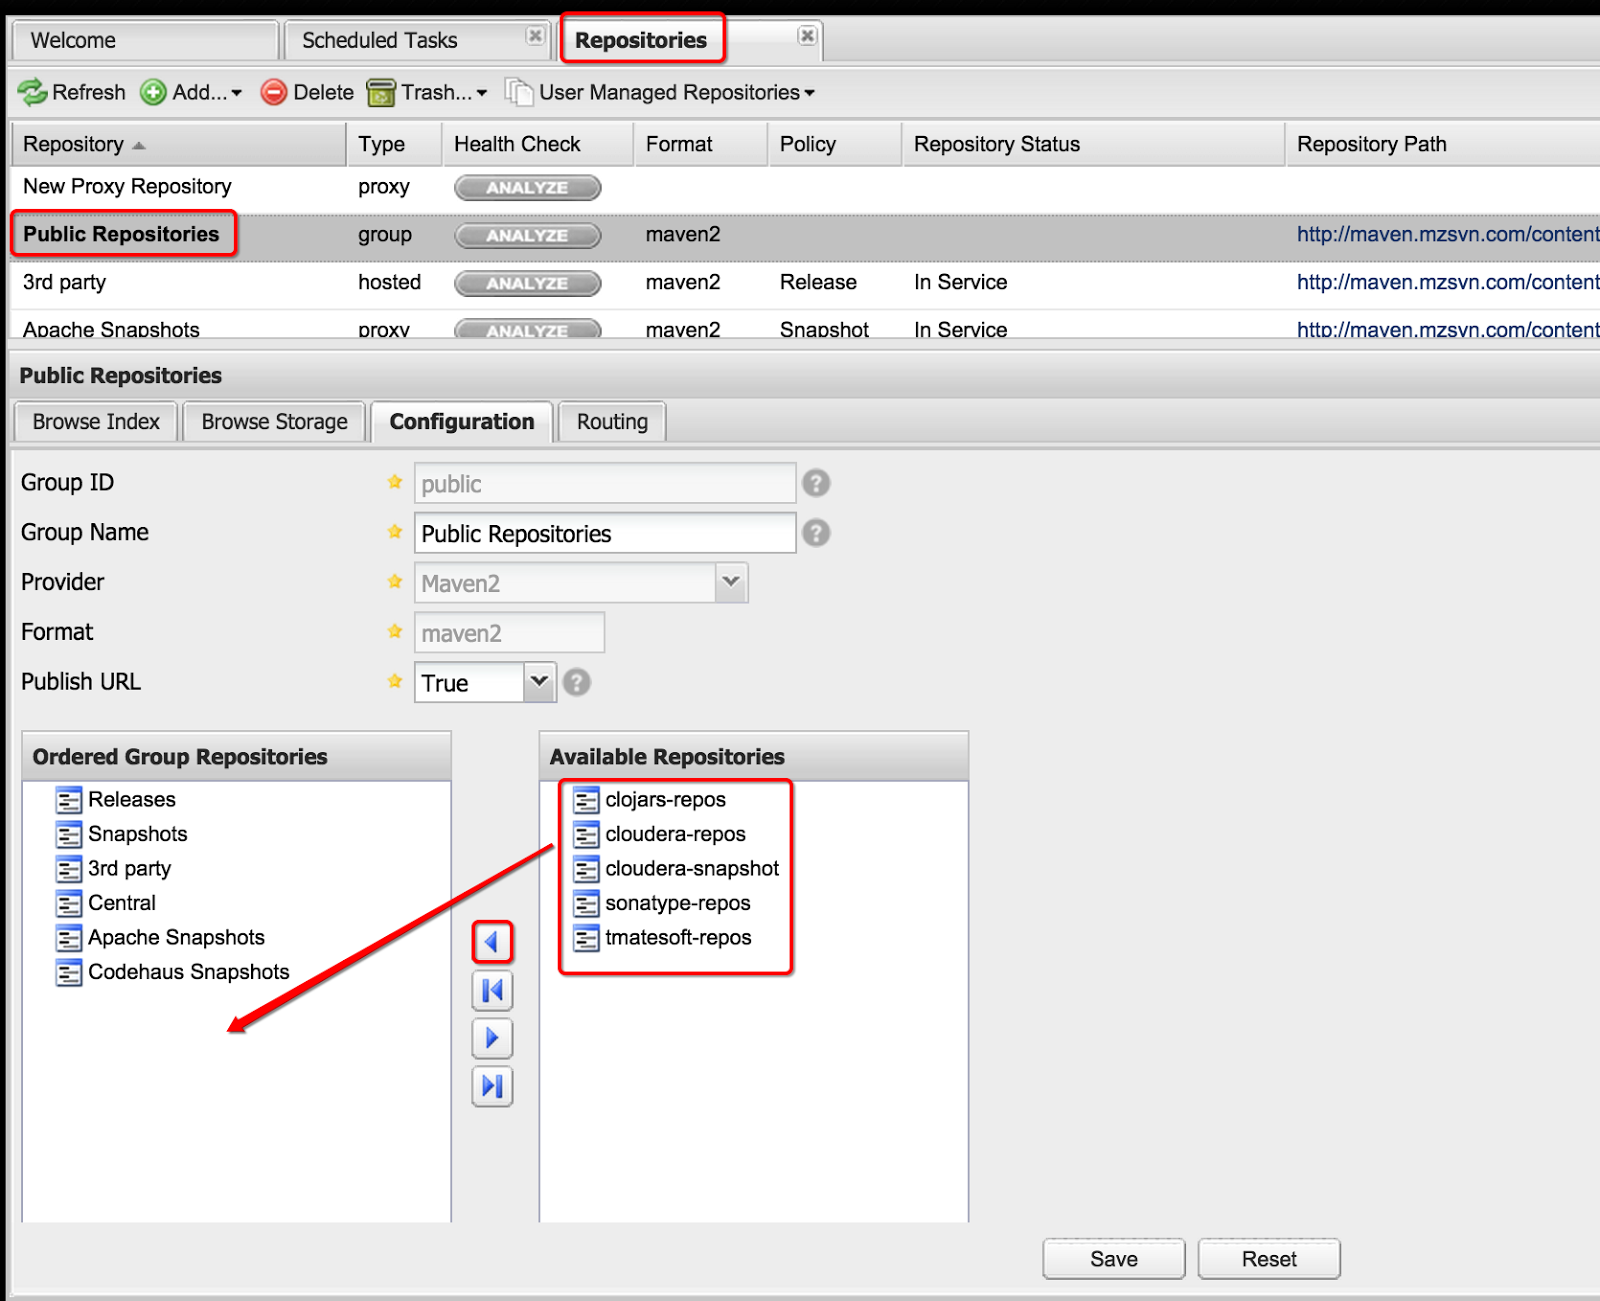
There are some commonly-used remote repositories which should be configured into our maven repository.

Firstly, we should add the proxy repository into our Repositories Module.


Next, append them into Public Repositories:


In this way, we could refer to almost all the common dependencies from our maven repository.


Reference:
1. Return code is: 401, ReasonPhrase:Unauthorized
2. Maven学习笔记(二、nexus仓库)
3. Maven学习笔记(三、maven配置nexus)
4. Linux 搭建Nexus


Thursday, April 9, 2015

NameNode Hangs After Startup

Phenomenon

Recently, namenodes in our Hadoop cluster hang frequently, with the phenomenon that HDFS command will stuck or SocketTimeout will be thrown. When checking on 'hadoop-hadoop-namenode.log', no valuable information is provided. But in log 'hadoop-hadoop-namenode.out', the following error is thrown:
Exception in thread "Socket Reader #1 for port 8020" java.lang.OutOfMemoryError: Java heap space
Exception in thread "org.apache.hadoop.hdfs.server.namenode.FSNamesystem$NameNodeResourceMonitor@5c5df228" java.lang.OutOfMemoryError: Java heap space

In the meantime, we could diagnose the process of NameNode via `jstat` command:
[hadoop@K1201 hadoop]$ jstat -gcutil 31686
  S0     S1     E      O      P     YGC     YGCT    FGC    FGCT     GCT   
  0.00   0.00 100.00 100.00  98.79     20   27.508    48  335.378  362.886

As we can see, Full GC Time (FGCT) is predominating the Total Time of GC (GCT), thus a lack of memory for NameNode is the culprit.

Solution

Apparently, namenode is complaining an OOM error. The way to increase heap space for namenode is in the configuration file '$HADOOP_HOME/etc/hadoop/hadoop-env.sh', where to put the following commands:
# The maximum amount of heap to use, in MB. Default is 1000.
export HADOOP_HEAPSIZE=20000
export HADOOP_NAMENODE_INIT_HEAPSIZE="15000"

Eventually, we should restart our namenode and check its current -Xmx (which stands for heap size) attribute via:
jinfo <namenode_PID> | grep -i xmx --color

We shall see that it has already changed to what we've set previously.

Alternatively, we could check memory status via HDFS monitor webpage as well:


Wednesday, April 8, 2015

Guide On Deploying Nginx And NodeJS Upon Vagrant On MAC

Today, I'm gonna deploy NodeJS, masking with Nginx at the front-end, upon Vagrant, which is lightweight, reproducible, and portable development environments based on virtual machine, on Mac OSX. So, let's get our feet wet!

Experimental Environment

1. Mac OSX 10.9
2. Vagrant 1.7.2
3. VirtualBox-4.3.14-95030-OSX
4. CentOS6.5.box
5. Nginx 1.6.2
6. NodeJS 0.12.2

Items from 2 to 4 can be downloaded from here, while the installation of Item[5] is at its official document, Item[6] at this site.

Install Vagrant And Deploy Nginx, NodeJS On Vagrant

Firstly, invoke the following prompt for preparation:
mkdir ~/vagrant
mkdir ~/vagrant/box
mkdir ~/vagrant/dev
mv ~/Download/centos6.5.box ~/vagrant/box

The `box` subdir is for our .box file, while `dev` subdir is for current "Vagrantfile" instance.

Now let's initial our first vagrant environment with commands as below:
vagrant box add centos ~/vagrant/box/centos6.5.box  # Load the centos6.5.box into VirtualBox
cd ~/vagrant/dev
vagrant init centos # Initial the above box, which will generate the 'Vagrantfile' file
vagrant up # Start up the vagrant environment corresponding to config in the 'Vagrantfile' file
vagrant ssh # ssh to the vagrant environment

In which, 'Vagrantfile' is the place where configurations resides, we'll see it later. `vagrant ssh` command is the abbreviation of `vagrant ssh default`, since we don't specify a name explicitly for current vagrant environment in 'Vagrantfile', it applies 'default' as its name.

Some relative and commonly-used vagrant commands are listed here for reference (we could simply invoke `vagrant` to check out elaborate information on sub-commands):
vagrant halt # Close current vagrant env and save data and cache on disk
vagrant destroy # Close current vagrant env and dispose all the data. The next time when calling `vagrant up`, it will initial vagrant upon 'Vagrantfile' from scratch
vagrant global-status # list current vagrant envs status

After logging in the vagrant environment, we could install Nginx and NodeJS as illustrated in the aforementioned URL.  As for Nginx, root user is needed. For vagrant env, the default root's password is 'vagrant'.

Implement HelloWorld Upon NodeJS And Access From Host's Browser

In the 'default' vagrant env, `vim ~/helloworld.js`:
var http = require('http');
http.createServer(function (req, res) {
  console.log(req.url);
  res.writeHead(200, {'Content-Type': 'text/plain', 'Content-Type': 'application/json;charset=utf-8'});
  res.end('Hello Jason!');
}).listen(1337, "0.0.0.0");
console.log('Server running at http://0.0.0.0:1337/');

In which, we should listen to '0.0.0.0' rather than '127.0.0.1' provided that we intend to access it from our host's browser later on. The reason is well-explained here (Empty reply from server - can't connect to vagrant vm w/port forwarding).

After editing this .js file, we could fire it up via `node helloworld.js`. Next, open a new prompt window, login to the same vagrant env and execute `curl 127.0.0.1:1337`, we should see the html content returning from NodeJS server.

However, we cannot access this webpage through host's browser since the vagrant env and host resides in totally different IP segments. This could be solved by port forwarding technique, which is well-illustrated in the official document.

In our scenario, we simply add the following configuration in 'Vagrantfile' file.
config.vm.network :forwarded_port, host: 4567, guest: 1337

In this way, we could access at http://127.0.0.1:4567 from host machine to the NodeJS server in vagrant env.

Mask NodeJS With Nginx

Now, we are going to mask NodeJS with Nginx, though there's only one NodeJS server at this time.

Configuration of Nginx is as follows, via `vim /etc/nginx/conf.d/virtual.conf`:
upstream nodejs {
    server 127.0.0.1:1337;
    keepalive 64;
}

server {
    listen 80;
    server_name 127.0.0.1;
    access_log /var/log/nginx/test.log;
    location / {
        proxy_set_header X-Real-IP $remote_addr;
        proxy_set_header X-Forwarded-For $proxy_add_x_forwarded_for;
        proxy_set_header Host  $http_host;
        proxy_set_header X-Nginx-Proxy true;
        proxy_set_header Connection "";
        proxy_pass      http://nodejs;
    }
}

By masking with Nginx, we should access http://127.0.0.1:80, then Nginx will assign our http request to its upstream (In current scenario, it is 127.0.0.1:1337). Start nginx via command `service nginx start` in root user.

Meanwhile, we should change our 'Vagrantfile' file so as to 'port forwarding' to 127.0.0.1:80.
config.vm.network :forwarded_port, host: 4567, guest: 80

Restart vagrant env by `vagrant reload`, login to vagrant env starting Nginx as well as NodeJS server. Eventually, we should be able to access NodeJS server at http://127.0.0.1:4567 from host.

Create Box From Current Vagrant Environment

To obtain a snapshot of current vagrant env, in which Nginx and NodeJS have installed, we could create a .box file from current vagrant env via command:
vagrant package --output /yourfolder/OUTPUT_BOX_NAME.box

Create Multiple Vagrant Environments In A Single Vagrantfile

After all the work above, we are ready to create multiple vagrant envs in a single 'Vagrantfile' file, which looks as follows:
Vagrant.configure(2) do |config|
  #config.vm.box = "jason_web"
  #config.vm.network :forwarded_port, host: 4567, guest: 80
  
  config.vm.define :node1 do |node1|
      node1.vm.box = "jason_web"
      node1.vm.host_name = "node1"
   node1.vm.network :forwarded_port, host: 4567, guest: 80
      node1.vm.network "private_network", ip:"192.168.10.10"
      config.vm.provider :virtualbox do |vb|
          vb.customize ["modifyvm", :id, "--memory", "1024"]
          vb.customize ["modifyvm", :id, "--cpus", "2"]
      end 
  end 
  
  config.vm.define :node2 do |node2|
      node2.vm.box = "jason_web"
      node2.vm.host_name = "node2"
      node2.vm.network "private_network", ip:"192.168.10.11"
      config.vm.provider :virtualbox do |vb|
          vb.customize ["modifyvm", :id, "--memory", "512"]
          vb.customize ["modifyvm", :id, "--cpus", "2"]
      end 
  end 
  
  config.vm.define :node3 do |node3|
      node3.vm.box = "jason_web"
      node3.vm.host_name = "node3"
      node3.vm.network "private_network", ip:"192.168.10.12"
      config.vm.provider :virtualbox do |vb|
          vb.customize ["modifyvm", :id, "--memory", "512"]
          vb.customize ["modifyvm", :id, "--cpus", "2"]
      end 
  end 
  
  config.vm.define :node4 do |node4|
      node4.vm.box = "jason_web"
      node4.vm.host_name = "node4"
      node4.vm.network "private_network", ip:"192.168.10.13"
      config.vm.provider :virtualbox do |vb|
          vb.customize ["modifyvm", :id, "--memory", "512"]
          vb.customize ["modifyvm", :id, "--cpus", "2"]
      end 
  end 

The configuration items are all self-explained well in the above configuration. The obvious difference between 'node1' and the others is that it has a port forwarding setting for the purpose of accessing Nginx service running at 'node1'.

If we intend to ssh from nodeA to nodeB, the default password for ssh is 'vagrant', which is the same as the root's password.

Login 'node1' and reconfigure the Nginx 'virtual.conf' as follows, then start it up!
upstream nodejs {
    server 192.168.10.10:1337;
    server 192.168.10.11:1337;
    server 192.168.10.12:1337;
    server 192.168.10.13:1337;
    keepalive 64;
}

server {
    listen 80;
    server_name 127.0.0.1;
    access_log /var/log/nginx/test.log;
    location / {
        proxy_set_header X-Real-IP $remote_addr;
        proxy_set_header X-Forwarded-For $proxy_add_x_forwarded_for;
        proxy_set_header Host  $http_host;
        proxy_set_header X-Nginx-Proxy true;
        proxy_set_header Connection "";
        proxy_pass      http://nodejs;
    }
}

Eventually, login to each node and start NodeJS server respectively. At this time, we should be able to access Nginx service from http://127.0.0.1:4567 on host machine, and http requests is distributed to different NodeJS servers.

Performance Benchmark Current Webserver

We could use Apache Benchmark toolkit to test our distributed webserver, whose command resembles:
ab -k -c 350 -n 20000 http://127.0.0.1:4567/

'-c' means 'concurrent', -k for 'keepalive', while '-n' stands for 'total request amount'. For more detailed guide on how to take advantage of it to the maximum, we could refer to this post.

For Mac OSX, there's a bug on `ab` command, which could be patched illustrating in this link.


Reference
1. Nginx Tutorial - Proxy to Express Application, Load Balancer, Static Cache Files
2. mac下vagrant 的使用入门
3. VAGRANTDOCS - GETTING STARTED
4. Removing list of vms in vagrant cache
5. How to run node.js Web Server on nginx in Centos 6.4
6. NodeJs的安装 Hello World!