Thursday, August 3, 2017

Summary On SparkSQL Function Types

There are three types of SQL operation:

1. Take values from a single row as input, and generate a single return value for every input row

A lot of built-in functions or UDFs such as substr or round belongs to this scenario. It is a one-to-one mapping procedure.
A typical SQL would look like:
select
userid,
score+20 -- one-to-one mapping (score) to (score+20)
from result

2. Aggregate on a group of rows and calculate a single return value for every group

Applying aggregation function like sumcountavg after group by syntax.
select
userid,
sum(score)
from result
group by userid

3. Operate on a group of rows, and return a single value for every input row

The difference between scenario 2 and 3 is that, scenario 2 will merge a group of values into one row of value, group is exclusive between each other; whereas scenario 3 will have a sliding window of values to cooperate with each row and return a row of value for each row.
which is illustrated as below:
Examplary data:
useridscore
11
13
115
17
24
21
216
Scenario 2:
select
userid,
sum(score)
from result
group by userid
After sum(score) and group by userid operation, each user's rows (in each group) will be aggregated into one and only one line:
useridscore
119 (1+3+15)
221 (4+1+16)
Scenario 3:
Calcluate the score difference between current score and the lowest score of each user:
select
userid,
score,
(score - min(score) over (partition by userid order by score asc rows between unbounded preceding and current row)) as score_diff
from results
In the above example, we apply window function in SparkSQL to iterate through every score and all preceding scores in each user. The format is as follows:
OVER (PARTITION BY x ORDER BY y frame_type BETWEEN start AND end)
  • partition by x will separate data into multiple partitions according to column x, and the window will be in range of each partition.
  • order by y will order each partition according to column y, this merely sorts the rows in current window, without changing the size of window.
  • frame_type has two values, namely, ROWS and RANGE, which stands for ROW frame and RANGE frame respectively.
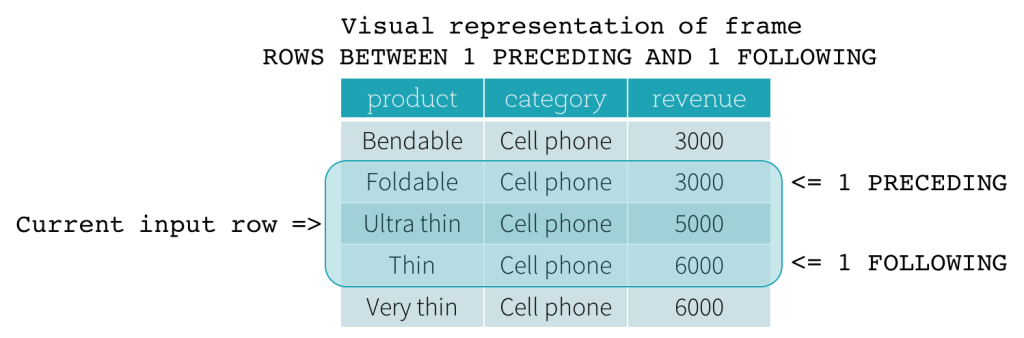
  • ROW frames are based on physical offsets from the position of the current input row, which means that CURRENT ROW<value> PRECEDING, or <value> FOLLOWING specifies a physical offset. If CURRENT ROW is used as a boundary, it represents the current input row. <value> PRECEDING and <value> FOLLOWING describes the number of rows appear before and after the current input row, respectively. The following figure illustrates a ROW frame with a 1 PRECEDING as the start boundary and 1 FOLLOWING as the end boundary (ROWS BETWEEN 1 PRECEDING AND 1 FOLLOWING in the SQL syntax). 
  • RANGE frames are based on logical offsets from the position of the current input row, and have similar syntax to the ROW frame. A logical offset is the difference between the value of the ordering expression of the current input row and the value of that same expression of the boundary row of the frame. Because of this definition, when a RANGE frame is used, only a single ordering expression is allowed. Also, for a RANGE frame, all rows having the same value of the ordering expression with the current input row are considered as same row as far as the boundary calculation is concerned. 
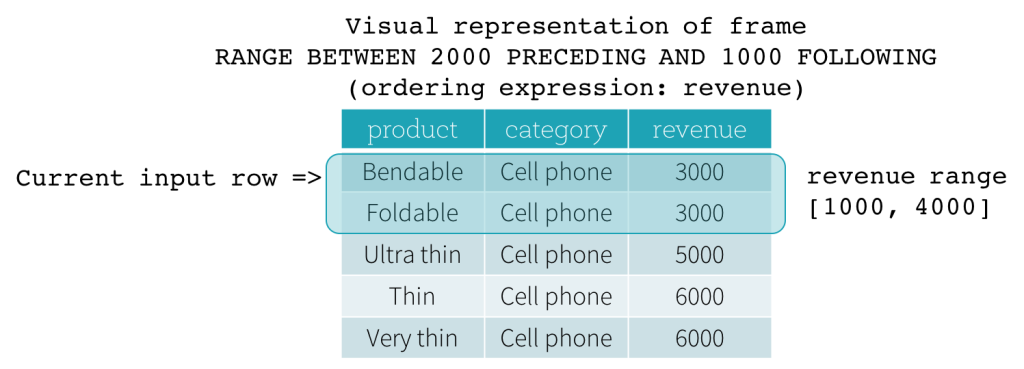
  • start and end could be UNBOUNDED PRECEDINGUNBOUNDED FOLLOWINGCURRENT ROW<value> PRECEDING, and <value> FOLLOWING.
  • UNBOUNDED PRECEDING and UNBOUNDED FOLLOWING represent the first row of the partition and the last row of the partition, respectively.
  • For the other three types of boundaries, they specify the offset from the position of the current input row and their specific meanings are defined based on the type of the frame illustrated above.
Actually, the default value for frame_typestart and end is ROWSUNBOUNDED PRECEDING and CURRENT ROW respectively. So the example in scenario 3 could be simplified to:
select
userid,
score,
(score - min(score) over (partition by userid order by score)) as score_diff
from results
which is also the same as all following SQLs:
select
userid,
score,
(max(score) over (partition by userid order by score asc rows between current row and unbounded following) - score) as score_diff
from results
select
userid,
score,
(max(score) over (partition by userid order by score desc) - score) as score_diff
from results

3.1 A Practical Use Case for Window Function - 1

For data below, we intend to cut each user's event flow into multiple sessions via adjacent time difference. If time difference is above 10, it's deemed to belong to two different sessions. For illustration, the data is represented in sorted order by column ts, which is not required in real use case.
useridts
11
13
17
121
125
140
21
27
227
229
Firstly, we'll apply window function to calculate time difference between adjacent events in pair:
select
  userid,
  ts,
  (ts - lag(ts, 1) over (partition by userid order by ts)) as ts_diff
from event_flow
This will generate temporary table as below:
useridtsts_diff
11None
132
174
12114
1254
14015
21None
276
22720
2292
Then we could apply another round of window function to mark each row with its corresponding session number:
select
  userid,
  ts,
  ts_diff,
  (sum(case when diff >= 10 then 1 else 0) over (partition by userid order by ts)) as session_number
from
(
    select
      userid,
      ts,
      (ts - lag(ts, 1) over (partition by userid order by ts)) as ts_diff
    from event_flow
) tmp
Eventually, we will have a temporary table like below:
useridtsts_diffsession_number
11None0
1320
1740
121141
12541
140152
21None0
2760
227201
22921

3.2 A Practical Use Case for Window Function - 2

Retrieve Top N in each group. We still use the examplary data in scenario 2:
useridscore
11
13
115
17
24
21
216
what we expect is to retrieve the top 2 highest score for each user.
Firstly, we assign row number to each user's rows ordering by score descedently:
select
  userid,
  score,
  (row_number() over (partition by userid order by score desc)) as rank
from results
Then we simply retrieve all rows with rank <= 2:
select 
  userid, 
  score
from
(
    select
      userid,
      score,
      (row_number() over (partition by userid order by score desc)) as rank
    from results
) tmp
where rank <= 2
The result will be:
useridscore
115
17
216
24

3.3 A hack for window function in MySQL

Data sample:
useriddttype
u123
u154
u243
u2104
If we intend to group by userid, substract dt from type 4 to type 3, so the result shoudl be:
useriddiff
u13
u26
This could be hacked by the following SQL:
+

select 
  userid,
  (t4.dt - t3.dt) as diff
from t t3
join t t4
on t.userid = t4.userid and t4.type = 4
where t.type = 3

3.4 Window Function VS Self-Join

Extend later from this post

Reference

  1. Introducing Window Functions in Spark SQL - DataBricks
  2. pyspark.sql module - 2.0.2
  3. pyspark, Compare two rows in dataframe - StackOverflow
  4. Date difference between consecutive rows - Pyspark Dataframe - StackOverflow
  5. split row into multiple sessions by time difference in pyspark - StackOverflow

Sunday, July 30, 2017

Optimize ETL procedure of transferring Hive table with billions of records to MySQL via Spark

There's a Hive table, which has 1.5 billion records and no partition, needs to be transferred to a MySQL (Aurora) table. According to Connecting to SQL Databases using JDBC. The code snippet is as follows:
import org.apache.spark.sql.SaveMode
import java.util.Properties

val jdbc_url = "jdbc:mysql://jdbc_url:3306/db_name?user=admin&password=xxxxxx"
val connectionProperties = new Properties()

spark.sql("select * from db.tbl")
  .write
  .mode(SaveMode.Overwrite)
  .jdbc(jdbc_url, "tbl", connectionProperties)
But this is super slow, estimating from Spark Jobs monitoring webpage that it will cost 38 hours to finish.
After reading this post, which mentions a parameter, rewriteBatchedStatements=true, that need to be specified every time bulk insert need to be applied via JDBC. This parameter will convert multiple single insert into one bulk insert illustrated as follows:
--FROM

INSERT INTO X VALUES (A1,B1,C1)
INSERT INTO X VALUES (A2,B2,C2)
...
INSERT INTO X VALUES (An,Bn,Cn)

-- TO

INSERT INTO X VALUES (A1,B1,C1),(A2,B2,C2),...,(An,Bn,Cn)
Moreover, since there's no partition in this Hive table, we need to use repartition to make the transferring procedure parallelized. So the code will be optimized to the following:
import org.apache.spark.sql.SaveMode
import java.util.Properties

val jdbc_url = "jdbc:mysql://jdbc_url:3306/db_name?user=admin&password=xxxxxx&rewriteBatchedStatements=true"
val connectionProperties = new Properties()

spark.sql("select * from db.tbl")
  .repartition(40)
  .write
  .mode(SaveMode.Overwrite)
  .jdbc(jdbc_url, "tbl", connectionProperties)
And the Aurora instance's capacity is increased accordingly (16CPUs, 32GB). The time has been reduced from 38 hours to 6.6 hours (62920 rec/s) estimated.
Lastly, the way to check big table's count is not by select count(*) from tbl (REF), which will slow down the LOAD process. Instead, using SELECT table_rows FROM information_schema.tables WHERE table_name = 'tbl' will be more efficient.

Monday, November 21, 2016

LInking spark-streaming-kafka jar to Spark

When trying to run kafka_wordcount.py from Spark's example, it complains error as below:

./bin/spark-submit  examples/src/main/python/streaming/kafka_wordcount.py localhost:2181 triest
OUTPUT:
...
________________________________________________________________________________________________

  Spark Streaming's Kafka libraries not found in class path. Try one of the following.

  1. Include the Kafka library and its dependencies with in the
     spark-submit command as

     $ bin/spark-submit --packages org.apache.spark:spark-streaming-kafka-0-8:2.0.1 ...

  2. Download the JAR of the artifact from Maven Central http://search.maven.org/,
     Group Id = org.apache.spark, Artifact Id = spark-streaming-kafka-0-8-assembly, Version = 2.0.1.
     Then, include the jar in the spark-submit command as

     $ bin/spark-submit --jars <spark-streaming-kafka-0-8-assembly.jar> ...

________________________________________________________________________________________________


Traceback (most recent call last):
  File "/Users/user_tmp/general/spark-2.0.1-bin-hadoop2.7/examples/src/main/python/streaming/kafka_wordcount.py", line 48, in <module>
    kvs = KafkaUtils.createStream(ssc, zkQuorum, "spark-streaming-consumer", {topic: 1})user_tmp
  File "/Users/user_tmp/general/spark-2.0.1-bin-hadoop2.7/python/lib/pyspark.zip/pyspark/streaming/kafka.py", line 69, in createStream
  File "/Users/user_tmp/general/spark-2.0.1-bin-hadoop2.7/python/lib/pyspark.zip/pyspark/streaming/kafka.py", line 195, in _get_helper
TypeError: 'JavaPackage' object is not callable

From which, we could extract information regarding kafka-0-8 and version=2.0.1, remember that for later use. Then we navigate to Spark Streaming Programming Guide - Linking Part, change the URL(http://spark.apache.org/docs/2.0.1/streaming-programming-guide.html#linking) to the corresponding Spark's version and click Maven Repository link in Linking Part so it will automatically search packages corresponding to your Spark's version. After that, finding ArtifactId in format 'spark-streaming-kafka-0-8-assembly_2.11' and version column equals to the previous version(=2.0.1), where 0-8 is retrieved from above and 2.11 is your Scala version. Log groupId, artifactId as well as version from this row.

Edit $SPARK_HOME/conf/spark-defaults.conf (origined from spark-defaults.conf.template file), append 'spark.jars.packages org.apache.spark:spark-streaming-kafka-0-8-assembly_2.11:2.0.1', which is in format 'spark.jars.packages groupId:artifactId:version'.

Eventually, run kafka_wordcount.py again, it should works normal this time.


Friday, November 18, 2016

No module named pyspark in PyCharm when it imports normal from python prompt

It complains compile error for command `import pyspark` saying that 'No module named pyspark' in PyCharm provided spark is not installed by `pip install`, whereas it could be imported correctly from python prompt.

Solution:
Find the path for 'SPARK_HOME/python/lib/py4j-0.*.*-src.zip:$SPARK_HOME/python/lib/pyspark.zip'. In PyCharm, open Preferences window, search for 'Project Structure' pane, at the right side, there's a button named 'Add Content Root', add the above two *.zip files here and click OK. Then everything works fine as expected.


Thursday, November 12, 2015

What Does ^m In Vim Mean And What Will It Possible Affect

There's a problem occurring to me when executing BigQuery load data operation, a seem-to-be one-line string in Vim is actually treated as multiple lines when I examining into the error log.

After opening this file in Vim, we could see that there're several ^m marks in the string (if it's not visible, invoke `:set list` command). According to Vim's digraph table, this is the representation of CARRIAGE RETURN (CR).


A specific sum-up for \r and \n is as follows:

    \r = CR (Carriage Return) // Used as a new line character in Mac OS before X
    \n = LF (Line Feed) // Used as a new line character in Unix/Mac OS X
    \r\n = CR + LF // Used as a new line character in Windows

Consequently, we should merely use \n as the new-line-character since almost all server are Unix-based, thus omitting \r when programming.

The way to replace \r\n with \n in Vim is to execute `:%s/\r//g`, whereas in CLI, we could apply `cat original_file | tr -d '\r' > remove_cr_file` to achieve the same effect.


Thursday, November 5, 2015

Configure SSL Certificate on Private Website Server

Since Restful HTTP API requested by iOS program must be in scheme HTTPS, an SSL certificate has to be encapsulated on our web service.

For experimental purpose, StartSSL is chose, which provides free-of-charge SSL certificate that are acknowledged by mainstream browsers like chrome, IE, etc.

Retrieve SSL Certificate from StartSSL

To get started, browse to StartSSL.com and using the toolbar on the left, navigate to StartSSL Products and then to StartSSL™ Free. Choose the link for Control Panel from the top of the page.

Make sure you are using Google Chrome

1. Choose the Express Signup. option
2. Enter your personal information, and click continue.
3. You'll get an email with a verification code inside it shortly. Copy and paste that email into the form on StartSSL's page.
4. They will review your request for a certificate and then send you an email with the new info. This process might take as long as 6 hours though, so be patient.
5. Once the email comes, use the link provided and the new authentication code (at the bottom of the email) to continue to the next step.
6. They will ask you to Generate a private key and you will be provided with the choice of "High" or "Medium" grade. Go ahead and choose "High".
7. Once your key is ready, click Install.
8. Chrome will show a popdown that says that the certificate has been successfully installed to Chrome.

This means your browser is now authenticated with your new certificate and you can log into the StartSSL authentication areas using your new certificate. Now, we need to get a properly formatted certificate set up for use on your VPS. Click on the Control panel link again, and choose the Authenticate option. Chrome will show a popup asking if you want to authenticate and will show the certificate you just installed. Go ahead and authenticate with that certificate to enter the control panel.

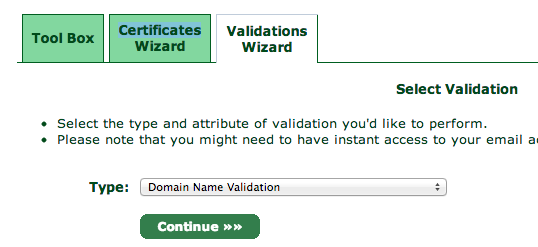
You will need to validate your domain name to prove that you own the domain you are setting up a certificate for. Click over to the Validations Wizard in the Control panel and set Type to Domain Name Validation. You'll be prompted to choose from an email at your domain, something like postmaster@yourdomain.com.

StartSSL

Check the email inbox for the email address you selected. You will get yet another verification email at that address, so like before, copy and paste the verification code into the StartSSL website.

Next, go to the Certificates Wizard tab and choose to create a Web Server SSL/TLS Certificate.

Start SSL

Hit continue and then enter in a secure password, leaving the other settings as is.

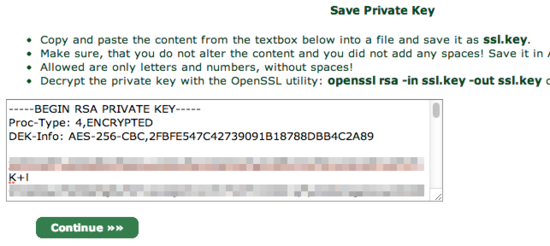
You will be shown a textbox that contains your private key. Copy and paste the contents into a text editor and save the data into a file called ssl.key.

Private Key

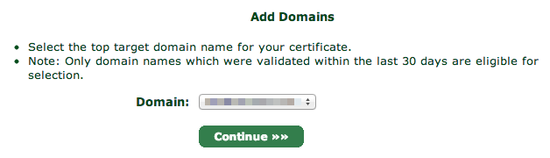
When you click continue, you will be asked which domain you want to create the certificate for:

Choose Domain

Choose your domain and proceed to the next step.

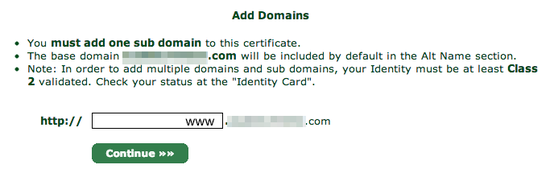
You will be asked what subdomain you want to create a certificate for. In most cases, you want to choose www here, but if you'd like to use a different subdomain with SSL, then enter that here instead:

Add Subdomain

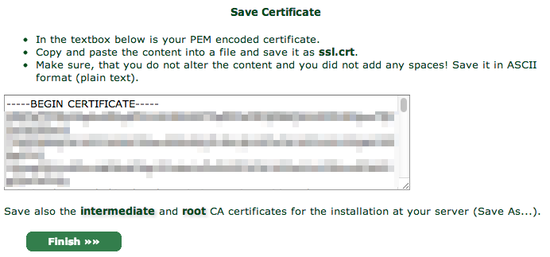
StartSSL will provide you with your new certificate in a text box, much as it did for the private key:

Save Certificate

Again, copy and paste into a text editor, this time saving it as ssl.crt.

You will also need the StartCom Root CA and StartSSL's Class 1 Intermediate Server CA in order to authenticate your website though, so for the final step, go over to the Toolbox pane and choose StartCom CA Certificates:

Startcome CA Certs

At this screen, right click and Save As two files:

StartCom Root CA (PEM Encoded) (save to ca.pem)
Class 1 Intermediate Server CA (save to sub.class1.server.ca.pem)

For security reasons, StartSSL encrypts your private key (the ssl.key file), but your web server needs the unencrypted version of it to handle your site's encryption. To un-encrypt it, copy it onto your server, and use the following command to decrypt it into the file private.key:

openssl rsa -in ssl.key -out private.key

OpenSSL will ask you for your password, so enter it in the password you typed in on StartSSL's website.

At this point you should have five files. If you're missing any, double-check the previous steps and re-download them:

ca.pem - StartSSL's Root certificate
private.key - The unencrypted version of your private key (be very careful no one else has access to this file!)
sub.class1.server.ca.pem - The intermediate certificate for StartSSL
ssl.key - The encrypted version of your private key (does not need to be copied to server)
ssl.crt - Your new certificate

Configure Nginx to Handle HTTPS

The basic way for this configuration is provided on StartSSL official document, how to install on Nginx server. Just one note, for Nginx configuration, we could simply integrate SSL settings with the HTTP one:

server {
    listen       80 default_server;
    listen       [::]:80 default_server;
    listen              443 ssl;     # Add for SSL
    server_name  _;

    ssl_certificate     /etc/nginx/sslconf/ssl-unified.crt;    # Add for SSL
    ssl_certificate_key /etc/nginx/sslconf/private.key;    # Add for SSL

    root         /usr/share/nginx/html;
    # Load configuration files for the default server block.
    include /etc/nginx/default.d/*.conf;

    location / {
        index index.html;
        proxy_pass http://test.hide.com:8888;
        proxy_cache nginx_cache;
        proxy_cache_key $host$uri$is_args$args;
        proxy_set_header Host  $host;
        proxy_set_header X-Forwarded-For  $remote_addr;
        expires  30d;
     }

    location ~ .*\.(ico|gif|jpg|jpeg|png|bmp)$
    {
            root   /home/hide/service/fileservice/;
    }

    location ~ .*\.(css|js|html)?$
    {
            root   /home/hide/service/fileservice/;
            expires 1h;
    }

    error_page 404 /404.html;
        location = /40x.html {
    }
    error_page 500 502 503 504 /50x.html;
        location = /50x.html {
    }

}

After executing  `service nginx restart`, we could simply access our website via https scheme.


REFERENCE:
1. How To Set Up Apache with a Free Signed SSL Certificate on a VPS
2. Setting-up Tomcat SSL with StartSSL Certificates
3. StartSSL 免费证书申请步骤以及Tomcat和Apache下的安装
4. SSL证书与Https应用部署小结
5. Configuring HTTPS servers - Nginx
6. Module ngx_http_ssl_module